First things first:
- Use automatic headers and footers to improve your text’s readability.
- Headers and footers provide orientation but should not be overloaded with information.
If headers feel like a hassle and you’d rather do without footers altogether, you might have tried integrating them manually into the main text. However, Microsoft Word offers many useful automation features, while manual layout adjustments can sometimes be tricky. To save you time and frustration, we’ll show you how to work with headers and footers and, for example, automatically insert chapter headings into the header.
All tips provided here are based on the latest version of Microsoft Word, available in Office 365 and Office 2019.
How to insert headers and footers
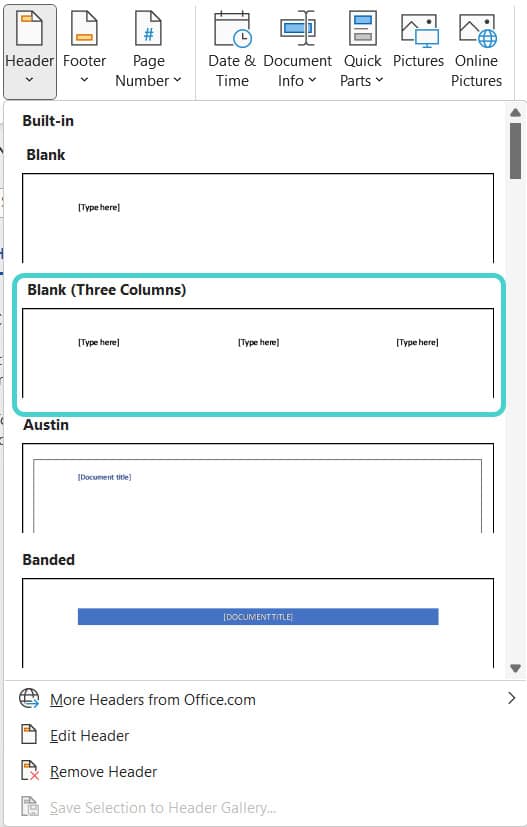
The function to insert automatic headers, footers and page numbers can be found under the “Insert” tab:

Click on the respective dropdown menu and choose a layout you like. The most versatile option is the “Blank (Three Columns)” template, as it provides the most flexibility. You can delete unused fields easily. Your selected element will then be inserted with one click.

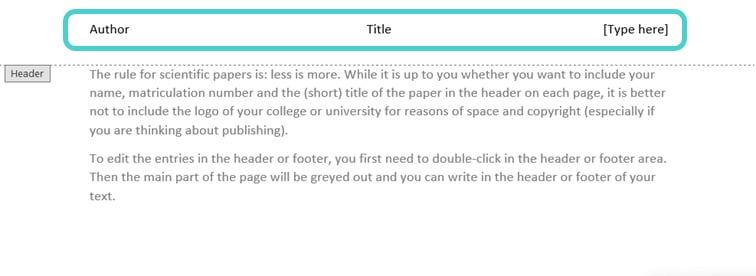
When it comes to scientific papers, less is more. Although it is up to you whether you want to insert your name, matriculation number and the (short) title of the thesis in the header of each page, you should rather do without the logo of your college or university for reasons of space and copyright (especially if you are thinking about publishing).
To edit entries in the header or footer, double-click in the respective area. The main page content will then be grayed out, allowing you to write directly in the header or footer.

For the font, it’s advisable to stick with Word’s default formatting styles (“Header” or “Footer”) or use a smaller font size (e.g., 10 pt) similar to footnotes and endnotes. While working in the header or footer, Word also activates the “Header & Footer Tools.”

Here you can:
- switch between section headers and footers
- switch between header and footer section by section
- use the same header or footer for multiple sections or define new options for each section
- you can define a different looking header or footer for the first page of each section with the “Different First Page” option
- you can insert different headers and footers for right and left book pages respectively with “Different Odd & Even Pages” option
- you shouldn’t change the position or size of your headers and footers because the distances from the top or bottom of the page are adjusted in such a way that the margins allow for printing
Usually, the title page of a scientific paper doesn’t contain a header or footer, and thus, no page number. To set this up, there are two options: You can either insert a section break after the title page and let the header and footer start with the second section – in this case switch off “Link to Previous”. This option makes more sense for longer texts, in which you use several pages without headers and footers. Otherwise, you can simply activate “Different First Page” without using a section break – this leaves the first header or footer empty. Both methods can also be combined, e.g. to differentiate the first header of a section from the rest.
GRIN Tip: Title page without headers or footers
Chapter references in the header: 3 quick steps
Including the current chapter in the header gives your text a professional layout and improves navigation, allowing readers to instantly see which section they are in. To make headers automatically reference chapter titles, follow these simple steps:
Assign the appropriate style
If you haven’t done so already, assign a style to the headings you want to appear in the header. The best choice is the “Heading 1” style for main headings. Alternatively, you can reference different heading levels for each section (e.g., “Heading 1” in one section and “Heading 2” in another). Separate sections with section breaks and disable the “Link to Previous” option as needed.
Select “Quick Parts” in the Header & Footer Tools
Double-click in the header area to access the Header & Footer Tools. Click where you want the chapter title to appear, then navigate to the “Quick Parts” menu on the left:

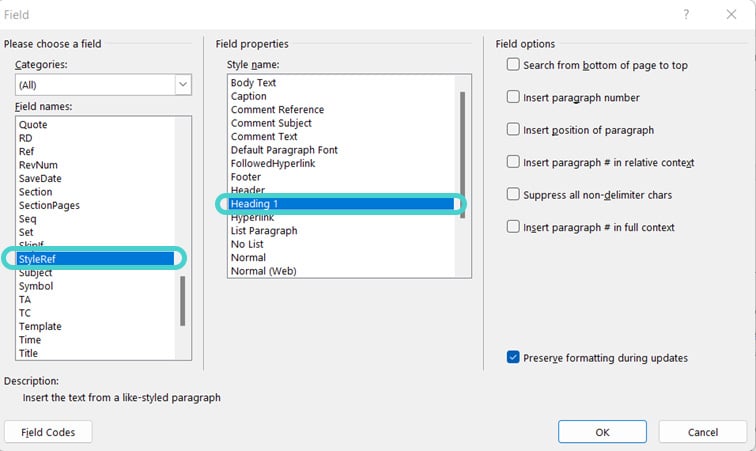
Scroll to “StyleRef” under “Field Names” and choose the style assigned to your headings.
Select Field and StyleRef
Under Quick Parts, select “Field” to open a new window.

That’s it! A dynamic reference to your chosen heading style will now appear at the cursor’s position, automatically updating with the current chapter title.
Did you know?
- Typographers agree that aesthetically balanced margins significantly improve readability and enhance focus on the text.
- In typography, the header is called the “head margin,” which refers to the unprinted space between the text and the top edge of the page.
- Its counterpart is the “foot margin,” located at the bottom of the page.
Sources:
- https://www.typolexikon.de/buchsatzspiegel-satzspiegel-schriftspiegel/
